
F-Log to ACES the Hard Way

THE JOURNEY
This gets a bit long, probably longer than it needs to be. If you just want LUTs, and the OCIO config you can get them from my github.

LET’S GO TO THE CEMETERY
Last Friday it was a beautiful evening and I found myself with a little extra time, a truly rare occasion. On such occasions I will fill time documenting a workflow or process. Writing down workflows helps me enforce standard ways of doing things, makes onboarding other artists easier and also helps to expose any inefficiencies in my process. Overall it is definitely worth the effort, but this was a Friday, and it was a beautiful night. I persuaded myself that the live action shoot to CG object lighting workflow needed some fleshing out, and that documentation needed supplementary pictures and video. I texted my friend Pat, he cycled on over we loaded up our bikes with a lightweight kit. By the time we set off time was against us. The sun was setting so we had to find some interesting place in the city that was preferably on a hilltop with a wide open area so we could milk the last remaining rays of light from the day. Pat said, like he does in many situations, “Let’s Go to the Cemetery!”
A LEARNING OPPORTUNITY
Once we rolled up we only had minutes until the sun dipped below the tree line. My exemplar lighting workflow assets were now going to be a case study in dealing with assets from a “run and gun” type shoot. Either way it was an educational trip, and also a fun evening biking around the city. The next morning I was curious to see what we had captured. I loaded the clips up into good old Nuke then a new issue dawned on me. I had used my my Fujifilm X-T2 to for our shoot. It is a nice small camera, and I really dig it. But I had it set to shoot in F-Log, Fujifilm’s own flavor of a log format. This is what I meant to shoot in, but I overlooked that F-Log isn’t supported out of the box with ACES.
I have been trying to push most things to be part of an ACES/OCIO workflow, but I haven’t felt super comfortable with customizing OCIO. Before using OCIO I would just come up with a different workflow for each camera. The studio I was at the footage was either going to be RED or Alexa, and it was easy to customize because I understood each step in the process. But just because I understood each step, doesn’t mean I was doing everything 100% accurately. I prioritized three aspects over the 100% accuracy. First footage always leaves the VFX department the same way it came in (with whatever we added or subtracted, obvs). Second, everything in compositing and CG renders had a linear gamma curve, and finally, the artists viewer looked the same as what client was seeing in dailies and edits, or if we had a LUT from color they were able to work with that.
The promise of ACES is that those three goals are maintained, but with more technical precision of files, and I don’t have to come up with a new workflow for each camera. The camera should have it’s own initial input transform or IDT, and then it’s ACES from there baby! Maybe it was time to pivot this lighting workflow example into an opportunity to dig a bit deeper into ACES and OCIO.
GLOSSARY BREAK
I’ve been throwing around some acronyms so I’ll take a moment to briefly expand them before we move on. Other people have spent more time describing these better elsewhere, like Chris Brejon, so I won’t attempt to explain in any depth.
OCIO - OpenColorIO - This is a toolset originally developed by Sony Imageworks which they have open sourced. It has been adopted by quite a few software packages natively to help the configuration and deployment of a color managed workflow
ACES - Academy Color Encoding System - ACES are methods and standards for maintaining accurate color throughout an entire production. It uses input transforms as defined by camera manufacturers to transform the footage into universal colorspace. Then that color space can be transformed to match the display device that the footage is being viewed on. That way no matter what the footage was shot on, or where it was being viewed it will maintain visual consistency. Visual Effects work can also be done in the ACES colorspace which aids in greater consistency throughout the entire image creation pipeline.
RESEARCH
Before I dove head first into this I did a bit of googling to see how other people might have handled a similar situation. I found a few things, it looks like there was working input transforms for the Davinci Resolve crowd, which if I was in a pinch I could just pull ACES plates from Resolve and be done with this. I really like the NukeStudio workflow for pulling plates and I am learning here! So next option was someone had made some ACES input transforms and were selling them for $15. I don’t know if I trust some random LUT from the internet. It might be a good exercise to add a LUT to the OCIO config file by hand, but it is learning that I crave! The next thing I found was Fujifilm’s official LUT for F-Log. They have three different LUTs available from their website:
XT2_FLog_FGamut_to_WDR_BT.709_33grid_V.1.00.cube
XT2_FLog_FGamut_to_FLog_BT.709_33grid_V.1.00.cube
XT2_FLog_FGamut_to_ETERNA_BT.709_33grid_V.1.00.cube
The last one is definitely out since it is baking the Eterna film simulation into the transform. The middle one is changing the gamut from F-Gamut to BT.709, but nothing else which doesn’t do me much good it was still had a Log curve. The top seems like it might be a winner. I guess if the manufacturer has a working LUT to use, I shouldn’t go through the trouble to making my own. So I checked that one a bit more carefully in Nuke. My process for validating the LUT is to
Bring in the a piece of footage with Macbeth chart, and turn off color management by checking the raw checkbox
Load the LUT in with an OCIOFileTransform Node
Use an OCIOColorSpace Node to transform from Rec.709 to ACEScg
I don’t think that last step is technically accurate. If you take a look at the naming convention of the LUT {camera name}_{input transfer function}_{input gamut}_to_{output transfer function}_{output gamut}_{LUT size}. If it had the gamma curve from Rec. 709 I would think it would say that as opposed to “WDR”. I don’t know of a WDR standard, maybe it is sRGB Wide-Gamut (but that is gamut not the curve), or is it Canon’s WDR curve. I don’t really know, but what I do know is that when I use the Macbeth chart to set the white point and black point, the rest of the grey chips don’t don’t match a linear image, so something isn’t being translated correctly, or there is additional tone mapping happening. I guess I have to do this the hard way. Which is probably what I wanted all along.
THE HARD WAY
On the same page as the Fujifilm LUTs is the F-Log datasheet , a magical PDF that describes mathematically what is happening with the image data. So all we have to do is figure out how to wrangle their color into ACES.
PROOF OF CONCEPT

Before I jump into OCIO I want to make sure that I can implement the necessary steps to properly transform the image before I try wrapping my head around OCIO. At first glance the F-Log datasheet looked obnoxiously complicated. But basically it breaks down into two steps.
TRANSFER FUNCTION
A transfer function is the equation or process of manipulating color information between different uses. Most commonly transfer functions transform from Log to Linear or back again. I’ll give another shot out to Chris Brejon’s transfer function explanation. What we want to do is transfer the data from F-Log to Linear. We need to use the F-Log to Scene Linear Reflection equation. It does look like there is a little logic involved as well so it can’t be a straight equation. Luckily the Nuke expression node can handle all of this. To keep things neat I added Floating Point Slider knobs for each of the variables, and prepended the names with f_ so they didn’t conflict with the built in variables of the expression node. We can’t just use a caret for exponents so we have to use the “pow” function, and instead of using “in”, we will use the variable for each channel so for the red channel we use “r”, green channel “g”, and blue channel “b”. So the red channel without the extra logic would look like:
pow(10, ( ( r - f_d) / f_c ) ) / f_a - f_b/f_a
And then with the additional logic it would look like:
r >= cut2 ? pow(10, ( ( r - f_d) / f_c ) ) / f_a - f_b/f_a : ( r - f_f ) / f_e


TRANSFORM GAMUT
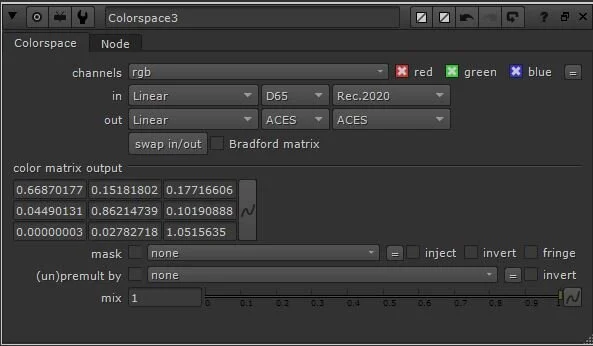
This get’s us pretty close but this is still not technically accurate because the color primaries and white point used with F-Gamut are compliant with the Rec.2020 standard which is different from ACES. Since we are just concerned about color primaries and not the transfer function we want use the Nuke Colorspace node and set it to:
Linear -> D65 -> Rec.2020
I chose these values because we just linearized the image and the data sheet mentions that F-Gamut is Rec.2020 compliant which has a white point at D65. And then we’ll set our “out” to
Linear -> ACES -> ACES
I chose those because, well I want to work in ACES.
But this image is still not accurate! We are actually further away with that last transform then we were before we did it. In When using ACES with Nuke the default working colorspace should be ACEScg. And the color primaries/gamut for ACEScg is actually closer to Rec.2020 primaries then they are to the actual ACES standards. We’ve been calling that ACES, but it is actually ACES2065-1, which has color primaries called ap0, and ACEScg has primaries called ap1. ap0 is a wider gamut, but to encompass all the colors it needs to it ends up including some negative values. This isn’t a big concern for footage because cameras don’t produce negative values, but for rendering, compositing, and color correction negative values in the gamut can cause some unexpected or unwanted results, which is why we work in ACEScg with the ap1 colorspace.
One more node to smoosh this footage into shape. We need to use an OCIOColorspace Node and go from ACES - ACES2065-1 to ACES - ACEScg. And that’s it, we’ve done it. Fujifilm F-Log footage transformed into ACES colorspace to work on in Nuke.

Building an OCIO Config
I am not creating those expression nodes and adding the colorspace and OCIOColorspace nodes every time I want to use F-Log. I could generate a LUT in Nuke and use that, but the main heading of the section is called “The Hard Way.” So I’m not doing that either.
Customizing Python Config Build Scripts
I forked the aces_1.1 config from the colourscience github. I won’t go too in depth with everything I did since I mainly just used the Sony colorspace python file as a guide. My updated version is on my github . There are two places that I edited. The first is where the bulk of the work will be done; In the colorspaces module located at aces_1.1/python/aces_ocio. Each camera manufacturer has a dedicated file where the information for LUTs to be generated and other metadata about the transforms are stored. The colorspace file will get imported into the main generate_config.py and from that import it will run the create_colorspaces function. So all we have to do is remake our proof of concept from in Nuke in the python file.
Just like before the first step is the transfer function, so convert the F-Log curve into a linear format.
def FLog_to_linear(f_log):
        a = 0.555556
        b = 0.009468
        c = 0.344676
        d = 0.790453
        e = 8.735631
        f = 0.092864
        cut1 = 0.00089
        cut2 = 0.100537775223865

        if f_log >= cut2:
            linear = pow(10., ((f_log - d) / c)) / a - b / a

        else:
            linear = (f_log - f) / e
        return linear
It’s almost exactly what we did in the expression node, just this time it is in python. The next step is to just add the matrix.
if gamut == 'F-Gamut':
        cs.to_reference_transforms.append({
            'type':
            'matrix',
            'matrix':
            mat44_from_mat33([
                0.66870177, 0.15181802, 0.17716606,
                0.04490131, 0.86214739, 0.10190888,
                0.00000003, 0.02782718, 1.0515635
            ]),
            'direction':
            'forward'
        })
There are bunch of different ways to figure out the matrix for the colorspace transform. I just copied it out of the Colorspace Node in Nuke. Using that information we create two different colorspaces. The first is flog_fgamut colorspace for the full conversion, and then there is the crvflog which is just the F-Log linearization. There is more configuration code as well in the file but those two pieces are the meat of it. After creating that file and saving it in the colorspaces folder, the next step is to update the generate_config.py file to tell it to import the new color space, and then add it to the config.
Add the import to the top with the rest of the colorspace imports
from aces_ocio.colorspaces import fujifilm
Then with the rest of the Camera Transforms add
for cs in fujifilm_colorspaces:
        config_data['colorSpaces'].append(cs)
And that’s it. Now the only little thing left is to wrangle all the dependencies needed to actually build this thing.
Build Container
It would be amazing if we could just press a button and it would make the our LUTs and OCIO config. Which is in theory what is supposed to happen now. The gap between theory and reality is filled with a ton of different pieces of software that this python script needs to be able to generate the config and LUTs. And this isn’t download an installer and press okay software. This is download (the correct version) of source code and build it for your platform. If I were on Linux and using RHEL or CentOS there I could get a lot of the way there with prebuilt packages. But I am on Windows. The fastest way for me to get this config built was to create a little mini Linux environment inside a container using Docker. Docker is great and saved a ton of hassle tracking down all the dependencies for this project.
If anyone else is interested in building their own custom configs in a similar manner I have the you would just have to change the git repository that this container is the python files from in the dockerfile.
The image I put together can be found at:
There are specific usage instructions on the docker page.
Results

The script recreated all the LUTs for ACES 1.1 along with my F-Log LUT and created an updated OCIO config. I opened up Nuke and pointed it at my config and the image exactly matched my proof of concept! Below is the config that was generated for F-Log. Overall, this was a bunch of effort for a result that I could have achieved any other number of ways. But it did give me a greater insight into ACES, OCIO and color science in general which is always a good thing. And with the build environment being a docker container that opens up fun automation possibilities of building new configs or updating configs for specific shows or pipelines.
- !<ColorSpace>
    name: Input - Fujifilm - F-Log - F-Gamut
    family: Input/Fujifilm
    equalitygroup: ""
    bitdepth: 32f
    description: |
      F-Log - F-Gamut

      ACES Transform ID : IDT.Fujifilm.FLog_FGamut_10i.a1.v1
    isdata: false
    allocation: uniform
    allocationvars: [0, 1]
    to_reference: !<GroupTransform>
      children:
        - !<FileTransform> {src: F-Log_to_linear.spi1d, interpolation: linear}
        - !<MatrixTransform> {matrix: [0.668702, 0.151818, 0.177166, 0, 0.0449013, 0.862147, 0.101909, 0, 3e-08, 0.0278272, 1.05156, 0, 0, 0, 0, 1]}

  - !<ColorSpace>
    name: Input - Fujifilm - Curve - F-Log
    family: Input/Fujifilm
    equalitygroup: ""
    bitdepth: 32f
    description: |
      Curve - F-Log
    isdata: false
    allocation: uniform
    allocationvars: [0, 1]
    to_reference: !<FileTransform> {src: F-Log_to_linear.spi1d, interpolation: linear}